The STYLO Editor
This guide will give you an overview of using the STYLO editor. The editor lets you create and manage all of the page content for your site. When editing your content, remember that it will be viewed on Tablets and Mobile phones. To see how it will look on other devices, make your browser window narrower and see how the layout updates automatically.
Clicking the left chevron icon at the top left of the screen will return you to the Pages area.
You can also use the button in the editor footer to return to the pages area. There are also buttons to Preview the current page (including all your current edits), Save a Draft, so you can carry on working later, and Save and Publish the page, which will make all your edits go live on the website.
Note that when you view a page in Preview, all links and any forms will be disabled. You also automatically create a draft version of the page, which is what you'll see.
Editing Content
The menu bar across the top of the screen lets you add and modify content. The chevron icons and at the ends of the menu bar will scroll the menu bar to show icons that may be scrolled of the edges of the menu.
When you click in an area of text in the editor, the left hand section of the menu strip is used to style the text or add links, symbols or line breaks.

Text Actions
The Text Based Actions and Alignment Actions can be applied to selected text.
Text-based Actions
| Action | Description |
|---|---|
| Bolds the selected text. | |
| Italicizes the selected text. | |
| Strikes the selected text. | |
| Sub-scripts the selected text. | |
| Super-scripts the selected text. | |
| Underlines the selected text. | |
| Shows a dialog which allows you to link the selected text to a page within your site or an external link. | |
| Places a <code> block around the selected text. | |
| Shows a dialog which allows you to insert a Font Awesome icon into the text block at the position of the cursor. |
Alignment Actions
| Action | Description |
|---|---|
| Aligns the selected text in the P, H1, H2, or H3 to the left. | |
| Aligns the selected text in the P, H1, H2, or H3 to the center. | |
| Aligns the selected text in the P, H1, H2, or H3 to the right. |
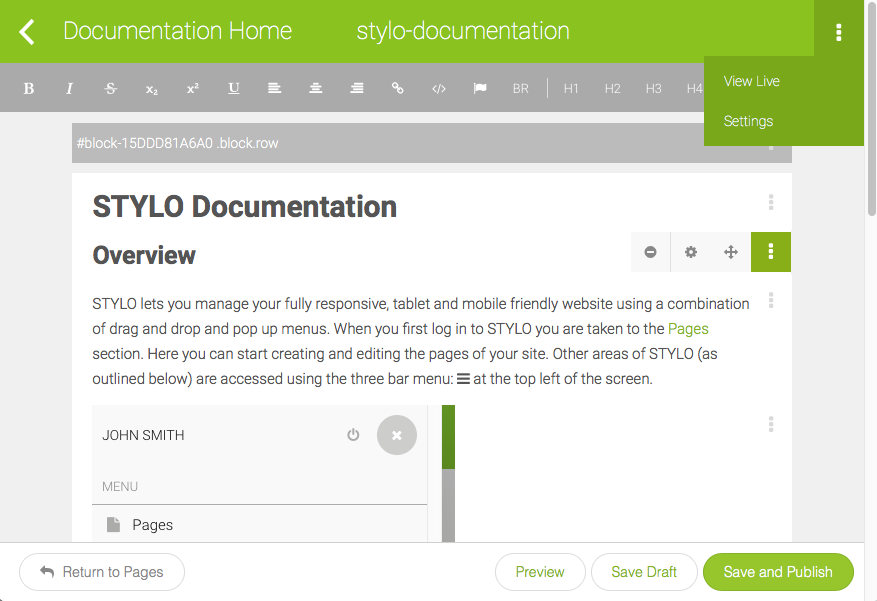
Ellipsis Menus
When editing content on the page, the three dot ellipsis: on the top right corner of a block opens a menu of options for the current item (block, image etc).

These will either be text based, or one or more of the following icons. Click the ellipsis again to close the menu.
| Icon | Description |
|---|---|
| Drag move. Drag this icon to move the currently selected item to a new location. | |
| | Settings. This opens a menu of settings for the current item. Where the item appears on your website in different styles (colours, outlines, background colours) then you will see an option on this menu for Style (CSS Class). This is a drop down for any applicable styles. |
| Move up. Click this to move the currently selected item up the page. | |
| Move down. Click this to move the currently selected item down the page. | |
| Copy. Click this to duplicate the currently selected item. | |
| Delete. Click this to delete the currently selected item. Be careful - this will happen right away. |
Adding Content
To create new content such as headings, paragraphs or images, drag items from the top menu strip onto the page, or click them to add the appropriate element right after the currently selected element.
The Blocks and Widgets can be dragged on to the page to create the layout.

Text Blocks
| Action | Description |
|---|---|
| H1 | Inserts a heading 1 (<h1>) block into the editor. |
| H2 | Inserts a heading 2 (<h2>) block into the editor. |
| H3 | Inserts a heading 3 (<h3>) block into the editor. |
| H4 | Inserts a heading 4 (<h4>) block into the editor. |
| H5 | Inserts a heading 5 (<h5>) block into the editor. |
| P | Inserts a paragraph (<p>) into the editor. |
| Inserts a block-quote (<blockquote>) into the editor. | |
| Inserts an un-ordered list (<ul>) into the editor. | |
| Inserts a table (<table>) into the editor. This is useful for tabular information such as timetables or price lists. |
The heading blocks H1 to H5 should be used in order of importance on your page, with H1 being the most important. When viewed on your web page they will generally be styled to reflect this priority, using the font size and possibly colour. They are important to SEO - see the Search Engine Optimisation page for more information.
Tables should be used for any kind of tabular information such as time tables or price lists. They should not be used for laying out content. The column widget (see below) is specifically designed for laying out content.
Other Blocks
| Action | Description |
|---|---|
| Inserts a horizontal rule (<hr>) into the editor. | |
| Adds a picture into the editor. By default, the picture is on its own, but you can choose to add text to the left and right of the picture by clicking configurations in the ellipsis menu. |
Rich Widgets
| Action | Description |
|---|---|
| Adds a slideshow widget to the editor. The slideshow allows you to display multiple images in a small area. | |
| Adds a map widget to the screen. Simply type an address and a Google map will display with the address of the location pin-pointed. | |
| Allows you to display your Twitter timeline on the screen using Twitter's standard widget. | |
| The Facebook widget adds a like button to your page. | |
| Allows you to embed a Youtube or Vimeo video to your screen by simply pasting in the embed code. | |
| Allows you to create a menu of pages for a specific menu type. You can create menu types in the Menus area. | |
| The file widget allows you to create a link to a file stored in the STYLO system. This allows you to make files like PDFs or Word documents available for download. | |
| The form widget allows you to create a simple form with text boxes, select boxes, checkbox lists, etc. The contents of the form get emailed to your primary email address when submitted, or to an email address you specify. | |
| The HTML widget allows you to insert HTML snippets into your page. This allows you to create custom blocks of code within the editor. | |
| The code block widget allows you to insert code to be displayed within your page. The code is not rendered, rather it displayed using Google Prettify. | |
| The plugins widget allows you to select custom plugins that can extend STYLO's features. You can read more about the standard plugins on the STYLO Plugins page. |
Layout Widgets
| Action | Description |
|---|---|
| The Load Existing Page option allows you to load the contents of the current page from an existing page. | |
| The columns widget allows you to create columns to add to your layout. Choose from: one column layout (100% width), two column layouts (50/50, 70/30, 30/70), three column layout (33/33/33), and four column layout (25/25/25/25 ). This will create a new block below at the bottom of the page with the chosen layout. You can use the new block's Ellipsis Menu to move it to another position, if required. |
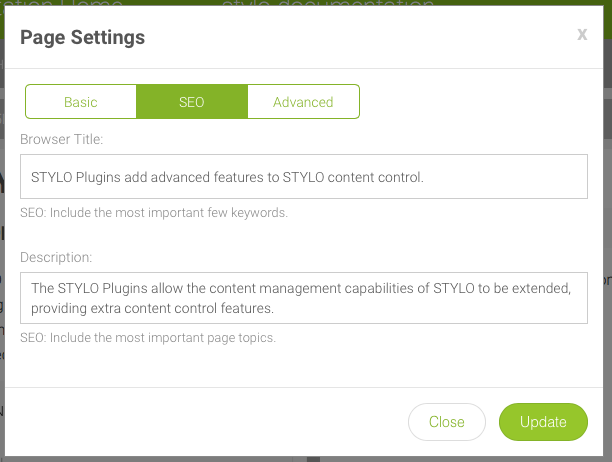
Page Settings
Clicking the three dot ellipsis menu: at the top right of the screen lets you edit the page's Settings.

The settings let you edit the page Name, URL, and the Section the page is in.
You can also edit the SEO setting for the page - Browser Title and Description.
The Advanced settings let you choose the page layout code used by the page. Your site may only have one layout, but sometimes this has separate options for the Home page or other more specialised pages.